Automating Data Pipelines with Airflow: From Data Cleaning to ML Deployment with Docker

Collosal amounts of data is being transferred from one place to another on a regular basis. Using this data is of utmost importance specially for machine learning applications to be up-to-date. Hence in this article, we’ll explore how to build an end-to-end data pipeline using Apache Airflow, emphasizing the critical role of data processing and cleaning in machine learning workflows. From collecting raw data to creating a docker image of machine learning models for production, we’ll cover the entire journey. Let’s dive in!
First Step!
We need to install Airflow. Once the setup is done, there will be certain file structure prepared for you to create and run DAGs.
Next, we will prepare data. Create a folder data at the same level as dags folder, and inside, put the Email Spam Classification data.
DAGs
Inside dags folder, create a new file where you will create your dags.
First, we will import the necessary libraries we will be using in this tutorial
from airflow import DAG
from airflow.operators.python import PythonOperator
from airflow.operators.bash import BashOperator
from datetime import datetime
import pandas as pd
import joblib
from sklearn.feature_extraction.text import TfidfVectorizer
from sklearn.preprocessing import LabelEncoder
from sklearn.model_selection import train_test_split
from sklearn.linear_model import LogisticRegression
from sklearn.metrics import accuracy_score
Now, we will need a DAG object so as to link the tasks we will define further
#Define default arguments
default_args = {
 'owner': 'your_name',
 'start_date': datetime (2023, 9, 29),
 'retries': 1,
}

# Instantiate your DAG
dag = DAG ('model_train', default_args=default_args, schedule_interval=None)
As we aim to create a machine learning model, data prepartion is a must for any such venture, hence we will add some data preprocessing task as well.
def cleaning(df):
    df['title'] = df['title'].str.lower()
    df['text'] = df['text'].str.lower()
    df['title'] = df['title'].replace(r"\W", " ", regex=True)
    df['text'] = df['text'].replace(r"\W", " ", regex=True)
    return df

def aggregate(df):
    df["msg"] = df["title"] + " " + df["text"]
    return df

def remove_extra_col(df):
    cols = df.columns
    to_remove = [x for x in cols if x not in ["msg", "type"]]
    if len(to_remove) > 0:
        df = df.drop(to_remove, axis=1)
    return df

def data_preprocessing():
    df = pd.read_csv("./data/email_spam.csv")
    df = cleaning(df)
    df = aggregate(df)
    df = remove_extra_col(df)
    df.to_csv("./artifacts/cleaned_data.csv", index=False)
Machine learning models need vectors to train the model, hence we will be applying TFIDF-Vectorizer on the text data and Label Encoder for the labels. Please note we can also just allocate 0 and 1 for labels here, LabelEncoder has been used to make code less complex for the first time users.
def create_artifacts(df):
    vectorizer = TfidfVectorizer()
    vectorizer.fit(df['msg'])
    joblib.dump(vectorizer, "./artifacts/vectorizer.sav")

    encoder = LabelEncoder()
    encoder.fit(df['type'])
    joblib.dump(encoder, "./artifacts/encoder.sav")
Now, its time to add some code to train our model
def prepare_train_data(df):
    vectorizer = joblib.load("./artifacts/vectorizer.sav")
    encoder = joblib.load("./artifacts/encoder.sav")
    X = vectorizer.transform(df['msg'])
    y = encoder.transform(df['type'])
    return X, y

def train(X, y):
    train_X, test_X, train_y, test_y = train_test_split(X, y, test_size=0.2)
    model = LogisticRegression()
    model.fit(train_X, train_y)
    joblib.dump(model, "./artifacts/model.sav")
    y_pred = model.predict(test_X)
    acc_val = accuracy_score(test_y, y_pred)
    return acc_val

def train_model():
   df = pd.read_csv("./artifacts/cleaned_data.csv")
   create_artifacts(df)
   X, y = prepare_train_data(df)
   accuracy = train(X, y)
   print(f"Accuracy: {accuracy}")
All the above code will be enough to train the model from scratch. But, Machine Learning is not just about training models. Hence, we will be creating a service that give the prediction based on our freshly trained model. For this, we will be using Docker to package the API along with model.
requirements.txt
apache-airflow==2.9.0
pandas
scikit-learn
joblib
api.py
from flask import Flask, request, jsonify
import joblib

app = Flask(__name__)

@app.route("/predict", methods=["POST"])
def predict():
    try:
        text = request.json.get("text")
        vectorizer = joblib.load("./artifacts/vectorizer.sav")
        encoder = joblib.load("./artifacts/encoder.sav")
        model = joblib.load('./artifacts/model.sav')
        X = vectorizer.transform([text])
        pred = model.predict(X)
        res = encoder.inverse_transform(pred)[0]
        return jsonify({"message": f"{res}!"})
    except Exception as e:
        return jsonify({"error": str(e)})

if __name__ == "__main__":
    app.run(host="0.0.0.0", port=8000)
Dockerfile
FROM python:3.11

COPY requirements.txt ./

RUN pip install --no-cache-dir -r requirements.txt

COPY api.py ./

COPY artifacts ./artifacts

CMD ["python", "api.py"]
Now back to dags file, we will be defining Operators which are templates for a predefined Task that can be imported and used as per requirement of the project.
data_preprocessing_task = PythonOperator(
 task_id='data_preprocessing',
 python_callable=data_preprocessing,
 dag=dag,
)

train_model_task = PythonOperator(
 task_id='train_model',
 python_callable=train_model,
 dag=dag,
)
Here, PythonOperator is being used to call a python function we have defined earlier. Every opearator needs a unique task_id to keep a track of their respective status. Each PythonOperator is assigned a method to call, and liked via the dag instance we have defined earlier.
create_image_task = BashOperator(
   task_id='create_image',
   bash_command='docker build . -t spam-classifier',
   dag=dag,
   cwd="./"
)
BashOpearator is used to execute Bash commands or Bash Scripts in Airflow.
Setting Task Dependencies
# Set task dependencies
data_preprocessing_task >> train_model_task >> create_image_task
Here, it is very crucial to define proper flow of the task. If not defined all the task will run pararelly which may result in breaking down of the pipeline.
A >> B signifies A must be completed first to execute the task B, similarly C << A signifies, C required A task to be completed to run.
Pipeline
Once all the steps have been completed, you can run the airflow using “airflow standalone”
It shall open the endpoint where you can enter the credentials airflow and secret-key generated on the terminal itself. Upon succesful authentication, you will see UI like this
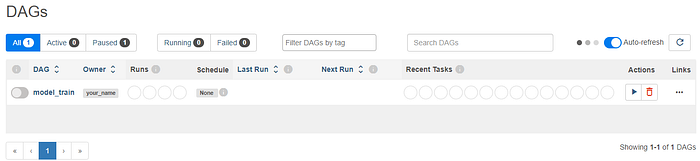
Once you click on the run button, it will execute the pipeline you have just created.
Voila! Congrats on creating and running your first DAGs.
Conclusion
In this article, we’ve explored the power of Apache Airflow in automating data pipelines from start to finish. From data collection and cleaning to deploying machine learning models using Docker, Airflow has proven to be a versatile tool for data engineers and data scientists alike.
Key takeaways from our journey:
- Data Cleaning Matters: Before diving into ML model training, robust data cleaning and preprocessing are essential. Airflow allows you to create reusable tasks for data transformation, ensuring high-quality input for your models.
- Pipeline Orchestration: Airflow’s DAGs (Directed Acyclic Graphs) enable seamless orchestration of tasks. You can schedule, monitor, and visualize your entire pipeline, making it easier to manage complex workflows.
- Model Deployment with Docker: We’ve seen how Docker containers simplify ML model deployment. By packaging your model and its dependencies, you can ensure consistency across different environments.
Github Repository:
Whether you think you can, or you think you can’t — you’re right
— Henry Ford